

In the fast-paced fashion world, poorly sized garments can harm your brand’s reputation and increase waste. Pattern grading is the key to solving this challenge by creating perfectly sized apparel while minimizing production inefficiencies.
Gears Sphere understands the value of this process in delivering sustainable and inclusive clothing. This article highlights the role of pattern grading in achieving these goals and how our manufacturing expertise helps bring your designs to life.
Pattern Grading 101: Designers Should Know
What is Pattern Grading?
Pattern grading is the process of turning a sample size or base size into additional smaller and larger sizes based on a size specification sheet. Instead of simply enlarging or reducing, grading creates a new shape by making increases and decreases while keeping the original shape of the garment intact. The main purpose is to proportionally increase or decrease the design while maintaining the same fit and shape across sizes.
Historically, pattern grading became essential with the rise of mass production and the advent of commercial patterns, developing as a science in the 19th century. Today, the pattern makers of your clothing manufacturers ensure that each pattern is graded to properly fit different body types. A middle-sized pattern, often a size S or size M, serves as the base to grade up into larger sizes and grade down into smaller sizes, making production more efficient.
How to Make a Sewing Pattern Bigger or Smaller
Grading sewing patterns is the act of making a pattern bigger or smaller so it fits body measurements correctly. Pattern grading is an interesting process because it’s not just about gradually increasing or decreasing between sizes. It requires careful consideration of how human body proportions grow at different sizes and how much to grade for a balanced fit.
The amount a pattern is supposed to be graded depends on body measurements and human growth proportions. The body grows differently in different areas at different ages. Patterns are usually graded into groups like baby, children, misses, and women, and also by height variations like regular, petite, and tall.
To grade a pattern to fit, you don’t just scale it up or down—you need to consider how the body grows to avoid distortions in areas like the shoulder, armhole, or bodice fit.
For example, a child’s body grows mostly in height and less in width, while a woman’s body changes more in width than height. The bust and waist may expand significantly, but the neck and shoulders stay relatively stable. If you only scale a bodice using horizontal measurements like bust, waist, and hips, the shoulder might end up too long or the armhole oddly shaped.
Do you need to grade a sewing pattern to fit?
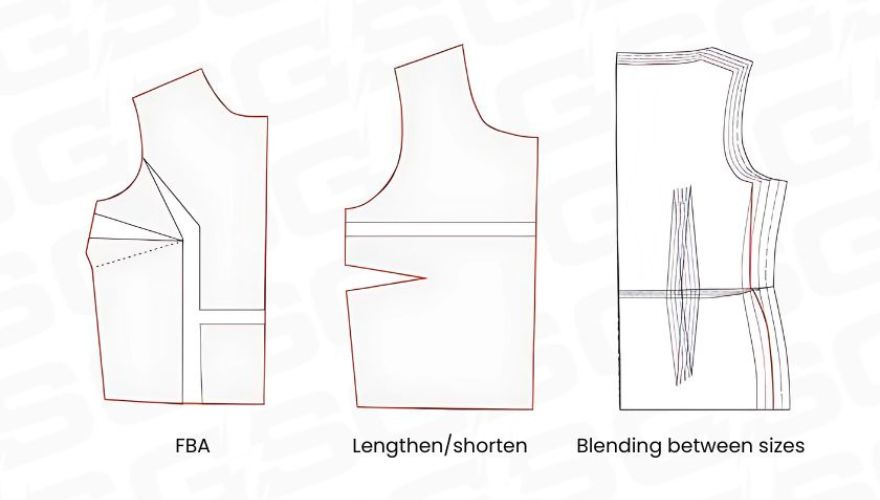
A pattern should always fit the body’s measurements, but sometimes it needs adjustments instead of full grading. For example, if the garment fits everywhere except the bust, a Full Bust Adjustment (FBA) might be enough—you do not have to grade the whole pattern.
If someone is taller or shorter, they may need to lengthen or shorten the torso or crotch area, depending on the garment they are working on. A nested pattern comes with smaller sizes nested inside bigger ones, allowing adjustments for various measurements.
By spreading different sizes, you can use blending to smoothly join pattern lines and make them respond to actual body measurements. If none of these solutions work, then most probably, you will need to grade the whole pattern to achieve a proper fit.
How to Measure for Pattern Grading?
To grade an existing pattern accurately, all design elements like gathering, pleats, and added volume must be adjusted while keeping the wearing ease included. Always consider how these changes relate to body measurements and size.
For example, when grading a size 10 up to a size 14, start by measuring the paper pattern for size 10 and compare it to the body measurements of size 14 from the pattern description.
Next, find out the difference between the patterns, body measurement charts, and finished garment measurement charts to calculate the amount of ease and ensure the design measurements match the right pattern dimensions. Then, calculate how much you have versus how much you need to grade up or down.
Many methods exist, but to true a graded pattern, test it in muslin before cutting good fabric for best results. It’s not recommended to grade more than two sizes, as the pattern may become distorted.
If you need more than two sizes, grade once to an intermediate new size, then grade once again to reach the size you want. When grading a girl’s pattern into a woman’s size, it’s usually better to redraft instead of grading up, as they are designed with different body proportions in mind.
Methods of pattern grading
There are four basic methods to grade a sewing pattern up or down: the slash and spread method, the shift method, grading nested patterns, and evenly graded patterns. Each technique ensures an accurately graded pattern by adjusting the design proportionally.
The slash and spread method
A popular way to resize a pattern, as the name suggests, is to draw lines through key locations where the body usually grows or shrinks. The pattern is then cut, spread, or overlapped to create a new size. This method requires a clear grid ruler, tape, paper, scissors, and a pen to ensure accuracy. The placement of slash lines follows general grading rules and varies based on different books and schools of patternmaking.
There are different variations in the position and number of lines depending on the specific garment. The lines are supposed to be cut and spread where the body expands, ensuring proportional changes. While grading rules guide the process, the slash lines are drawn in approximate positions based on where the body tends to grow or shrink. This method is widely used because of its flexibility in adjusting fit while maintaining the garment’s original shape.
Increasing or decreasing the size of a bodice
To change the size of a bodice pattern, adjustments are made by ¼ of the body, meaning the total difference is divided by four.
For example, if the measured bust is 46 inches, but the pattern bust is 42 inches, the total increase is 4 inches. Since the pattern works with ¼ of the body, this 4-inch difference is divided by 4, resulting in a 1-inch spread along the slash and spread lines of the bodice.
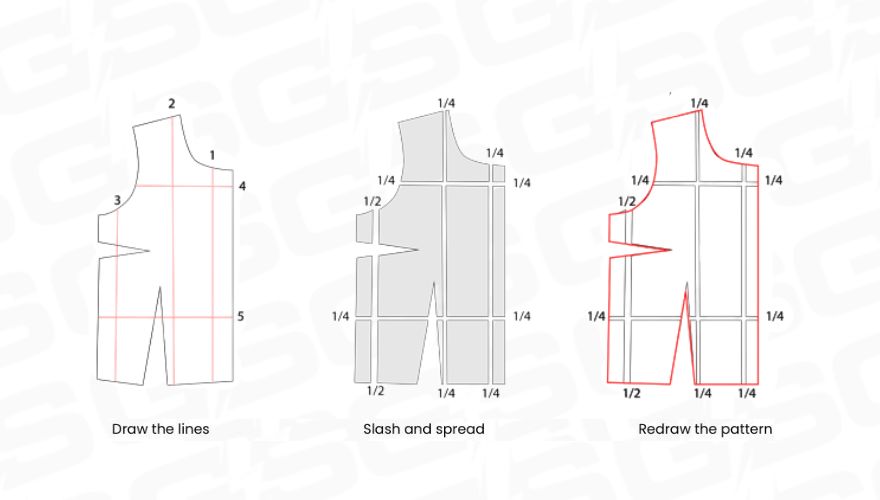
To adjust, draw three vertical lines from the neckline to the waistline, placing them at the shoulder, waist, and lower armhole curve while being careful not to distort the waist dart. Then, draw two horizontal lines at the center front and armhole side seam.
Cut the lines, and divide the 1-inch spread as follows: ¼ inches at lines 1 and 2, ½ inches at line 3, and ¼ inches at horizontal lines 4 and 5. Finally, redraw the pattern, smooth curves, and refine edges to maintain the proper fit. These same instructions apply to the back bodice pattern piece, ensuring a balanced adjustment.
Adjusting Sleeve Size for a Graded Bodice
To adjust a sleeve so it fits a graded bodice pattern, similar changes must be applied in the same places as the bodice. Start by drawing three horizontal lines across the bicep, elbow, and hem to mark the cap (line 1), bicep to elbow (line 2), and elbow to hem (line 3).
Next, add vertical lines at key points: one from seam to front notch to hem (line 4), another from seam to back notch to hem (line 5), and a central one from cap sleeve to hem (line 6). If the pattern has no notches, approximate these positions carefully.
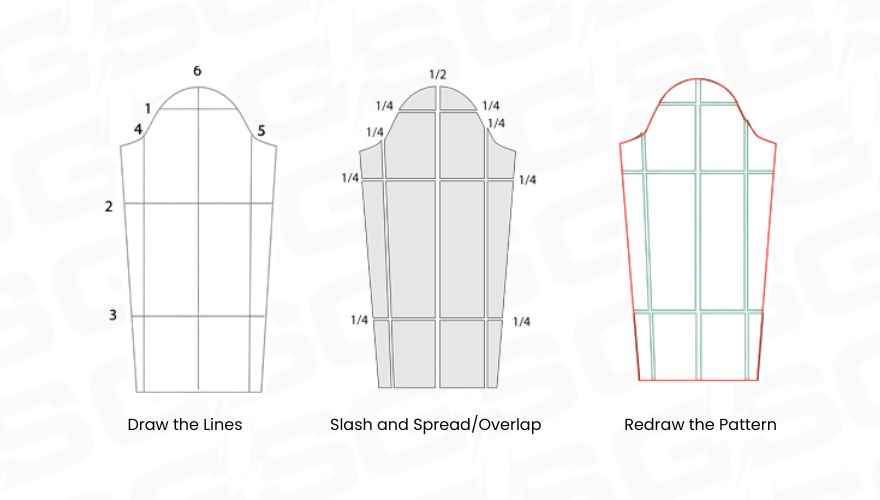
For grading, the sleeve should match the bodice using the same inch spread. Cut along the drawn lines, divide the needed increase, and add ¼ inch at horizontal lines (1, 2, 3) and ¼ inch at lines 4 and 5, with ½ inch at line 6.
The sleeve curve must also increase by two inches to match the armhole length, with ¾ inch added to both front and back, giving a total extension of 1 ½ inches.
The final formula follows: 4 x ¼ + ½ = 1 ½ inch. Redraw the sleeve, smooth curves, refine edges, and “walk and true” the sleeve against the armhole curve to ensure a proper match.
In centimeters, this translates to 0.75 cm added at the armhole curve for the front and back bodice, and 1.5 cm for the overall extension of the sleeve (4 x 0.25 + 0.5 = 1.5 cm). Always check that the sleeve matches the armhole by walking and truing the pattern.
Adjusting Skirt Pattern Size
To change the size of a skirt pattern, divide the total difference by four, since patterns cover ¼ of the body.
For example, if you need to increase the size by 4 inches all around, each front skirt piece requires a 1-inch adjustment. Use the slash and spread lines to spread the skirt front evenly.
Draw three vertical lines: one from waistline to hem at the center front (line 1), another through the dart (line 2), and a third from dart to side seam (line 3). Add two horizontal lines across the hipline (line 4) and mid-thigh (line 5).
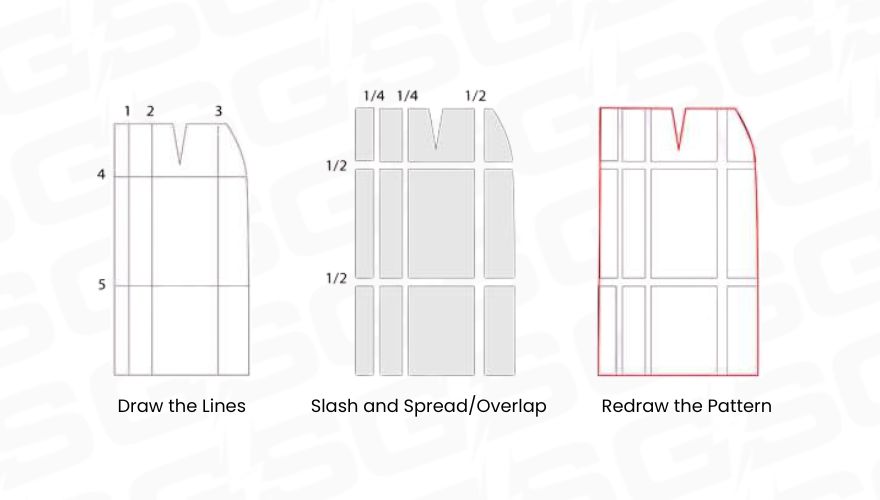
To cut and spread, divide the one-inch increase across these lines: ¼ inches at line 1 and 2, and ½ inches at line 3. Apply the same logic to the horizontal lines, adding ½ inches at lines 4 and 5.
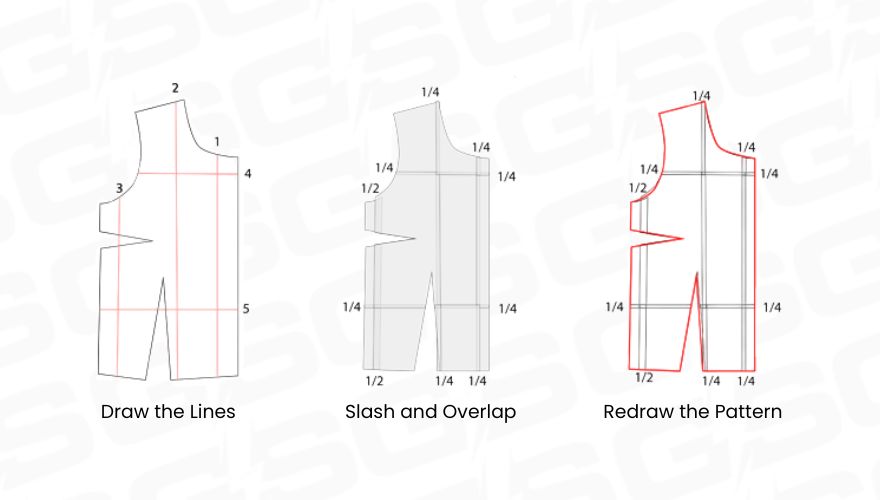
If working in centimeters, a 4 cm upgrade means spreading 1 cm per ¼ skirt, with 0.25 cm adjustments at lines 1 and 2, and 0.5 cm at lines 3, 4, and 5. To make the pattern smaller, overlap instead of spreading, using the same instructions. Don’t forget to make the same adjustment to the back skirt pattern piece for balance.
Adjusting Pants Pattern Size
To size a pants pattern, first divide the total difference by four since each pattern piece covers ¼ of the body. If the required increase is 4 inches all around, each front and back piece gets a 1-inch overall increase.
Use slash and spread lines to evenly spread the pattern. Draw three vertical lines: two from the waistline to the hem at the center front (lines 1, 2) and one from the dart to the side seam (line 3).
Add two horizontal lines at the hipline (line 4) and mid-thigh (line 5). Include an extra vertical line at the midpoint of the front and back crotch extension (line 6) for balance.
To grade the back pattern piece, follow the same steps and cut along the lines. Distribute the 1-inch increase as ¼ inch at lines 1 and 2, ½ inch at line 3, and ½ inch at each horizontal line (lines 4, 5).
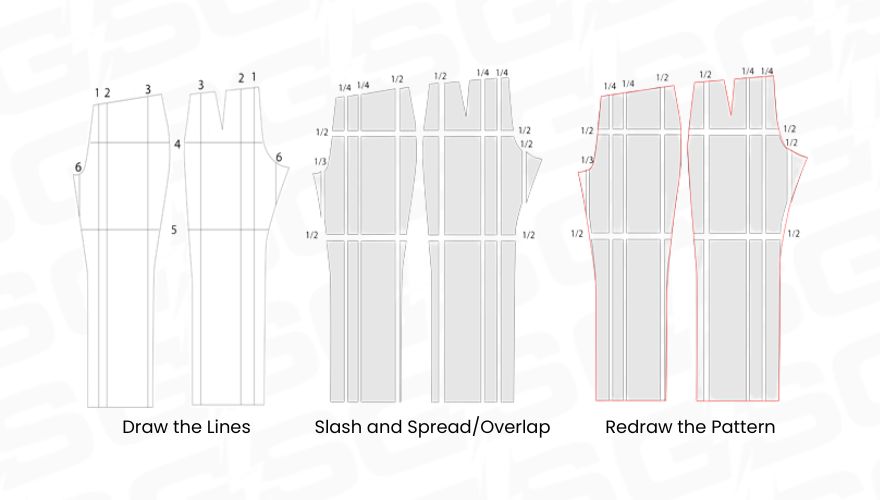
For the crotch, add ⅓ inch at the front and ½ inch at the back. In centimeters, a 4 cm upgrade means 1 cm per ¼ pants, with 0.25 cm at lines 1, 2, 0.5 cm at lines 3, 4, 5, 6, 0.3 cm at the front crotch, and 0.5 cm at the back crotch.
To make the pattern smaller, overlap the same amounts instead of spreading and redraw the pattern with smooth outlines.
Grading Nested Patterns
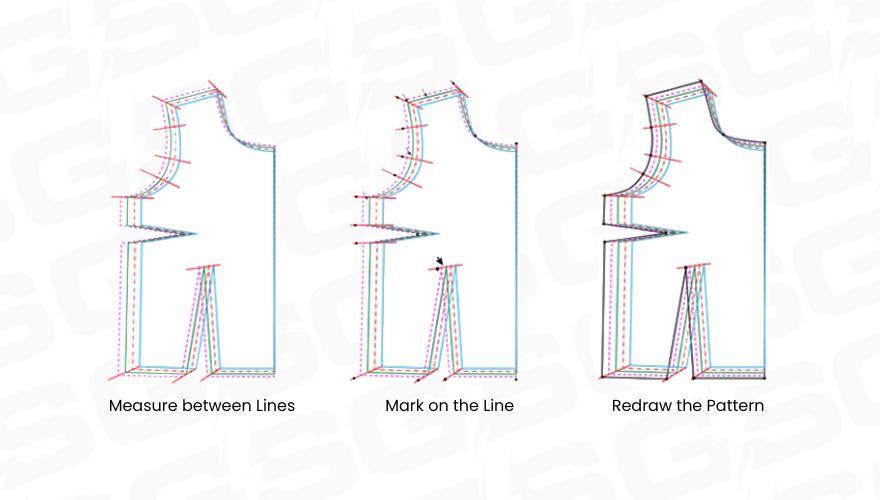
Evenly graded patterns maintain the same distance between sizes at every point by using a precise system. To check if a pattern is evenly graded, draw a straight line through the corresponding points, such as the bust, neckline, and hemline.
Most commercial patterns are nested, with smaller sizes arranged inside bigger sizes. If a pattern increases the same distance between sizes, such as the neckline rising 1/16 inch per size and the hemline dropping 1/4 inch, it follows this system. See the image below for reference.
To adjust a pattern, measure the changes between sizes and mark dots along the line following the grading increments. If the pattern needs to be sized up or down, first identify the needed adjustment by checking where the pattern changes.
Then, connect these dots with a smooth curve for rounded areas like the armhole or use a straight line where applicable. Ensure all angles are right and maintain proper grading flow. If grading up two or three sizes, double or triple the grading distance at every point while keeping proportions balanced.
The shifting method for pattern grading
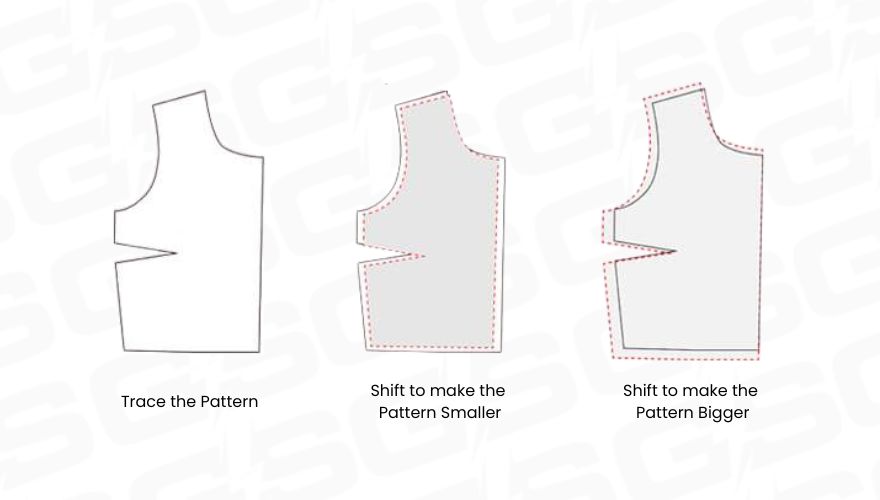
Pattern shifting is a simple way to increase or decrease the size of a pattern by tracing and moving it a measured distance in a specific direction. To make a smaller size, trace the original pattern, then move it in or up from a fixed point, usually at the center front or back bodice.
For a bigger size, trace the pattern, then move it out or down by a fraction of the overall difference needed. This method is known for accurate results, though the slash and spread method is often preferred for complex designs.
Since special grading rulers can help simplify the process, some designers prefer this method for a grade that might give the best match.
Quick and Easy Bodice Grading
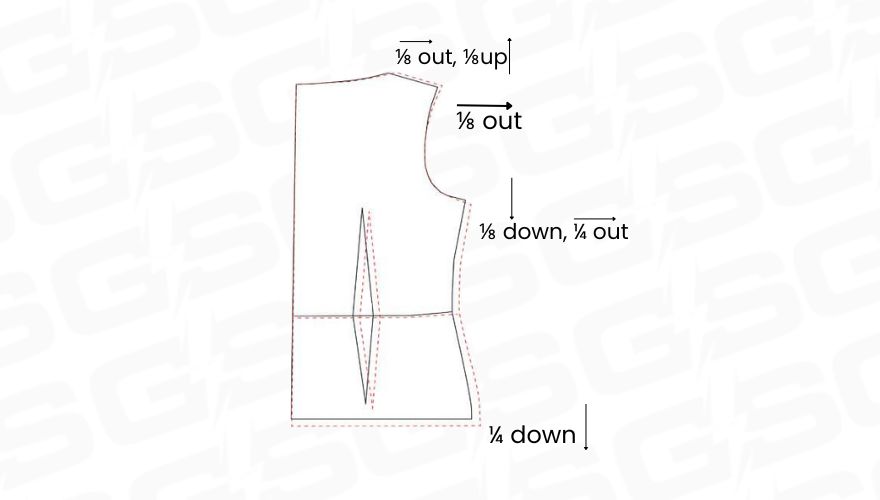
If you need a method to grade manually in a hurry, this approach is easy, fast, and produces accurate results for simple patterns. While it’s not seen in many books on grading, it’s a great way to quickly adjust a pattern without complex calculations.
Instead of just shifting points, focus on how the garment will fit and feel. To grade a bodice pattern from size 6 to 8, start by adding ¼ inch at the shoulder for extra room. Lower the armhole slightly by ⅛ inch to improve mobility.
To maintain balance, let out ⅜ inch at the sides, and if the waist needs to sit lower, drop it by ¼ inch, which also shifts the dart placement slightly outward. Finally, add ½ inch to the hem to keep the proportions looking right.
Using the center front and back points, retrace the new pattern size while following all measurements. For larger sizes like 16 and up, simply replace the smaller adjustments with more proportional increases.
Computerized Pattern Grading
Computer grading is the fastest and easiest method to grade patterns, but it requires specialized knowledge and familiarity with specific software.
While grading sewing patterns digitally can be highly efficient, the specialized software used for this process is often very expensive. Many professionals replace high-cost tools with much cheaper software for digital design, allowing them to digitalize and grade patterns without heavy investment.
Recommended programs include Adobe Illustrator CC and Lectra Modaris—though not created for pattern design, they offer a set of tools that can provide great, accurate results for sewing patterns.
While the software has a learning curve, once mastered, it allows users to spend considerably less time compared to manual grading. Some other types of software are completely free and open-source, like Valentina, which can replace Adobe Illustrator and Lectra Modaris at no cost. However, free sources often come with some limitations, making it essential to choose the right tool based on project needs.
Grade Specs and Rules in Pattern Grading
Grading a Pattern vs. Altering a Pattern
Grading and altering a pattern may seem similar, but they are different and separate processes. Grading follows a strict formula, where every key measurement and point is changed in a structured way. This ensures the garment maintains the same fit and proportion at each new size. Basically, it’s about creating the same style in another size, keeping all design elements balanced.
Altering a pattern, on the other hand, means only modifying some parts of the pattern. The same fit and proportions are not maintained because a new size is created for a specific, custom size. For example, if the shoulder width stays the same, but the bust circumference is adjusted for a bigger size, the overall shape and balance of the design may shift.
What Are Grade Rules and Grade Rule Libraries?
A grading rule determines how a point of measurement (POM) changes to make a pattern larger or smaller while keeping a good fit. It ensures a manufactured garment has the right overall balance and shape across a wide range of sizes.
For example, a chest measurement may increase or decrease by 2 inches in standard size grades. If a sample is made in M, then making an L would require it to be 2 inches larger following a set rule.
A grade rule library is a collection of rules used to adjust the entire pattern to meet specific specifications. These libraries can vary depending on the design features, fabric properties, and the type of grading needed. A knit pair of pants may have different rules compared to woven pants, even if they share the same style.
Master the Art of Pattern Grading
For private label clothing brands, mastering pattern grading is essential to delivering consistent, well-fitting garments. Whether you’re working with a cut and sew manufacturer or producing in-house, understanding the nuances of pattern grading ensures that your designs translate seamlessly from concept to finished product.
Level Up Your Patterns Grading Skills
No matter how many pieces a pattern has or how complicated the design may be, all patterns are based on main slopers. To grade up or down, the process starts with a basic pattern and applies structured adjustments to achieve consistent sizing.
When I worked on a recent project, I graded from toddler sizes to youth size 12, then expanded to adult sizes XS to 2X.
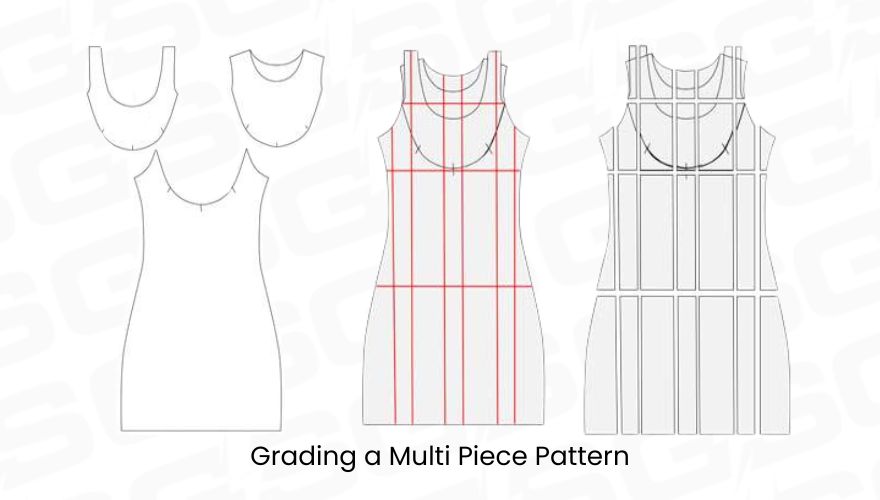
This challenge tested my grading skills as I started with toddler sizes, then moved through youth sizes up to 12, and finally graded into adult sizes, covering both standard and extended sizes. A multi-piece pattern like this required extra attention to detail to keep everything aligned.
To grade a multi-piece pattern, the approach is the same as grading a one-piece bodice, pants, or skirt pattern. For a particular dress, I used the slash-and-spread method. I first stacked the pattern pieces to see how they would come together when sewn, then drew slash-and-spread lines at the necessary positions.
Since the pattern had a full front, I used six vertical lines instead of three. I also added three horizontal lines because the dress combined a bodice and skirt. Once the lines were set, I carefully slashed, spread, and redrew the pattern in its new sizes.